Shopify
Summarize this blog post with:
TL;DR
- Most Shopify store failures in month one are preventable. The issues that cause abandoned carts, lost sales, and compliance problems are almost always configuration gaps from launching without a systematic setup checklist rather than product or market problems.
- The eight-step Shopify store setup checklist in this guide covers every configuration category that determines whether a Shopify store is legally compliant, technically operational, and positioned to convert traffic from day one.
- Payment processing failures and shipping configuration errors are the two most common causes of immediate revenue loss after a Shopify store launches. Both are entirely preventable with correct pre-launch testing using Shopify’s built-in gateway test mode.
- A2Z Dev Center has launched Shopify stores for merchants across the US and Michigan market. The stores that launch without professional oversight consistently miss two to four of the eight checklist categories, each representing a live revenue risk on day one.
What is a Shopify Store Setup Checklist?
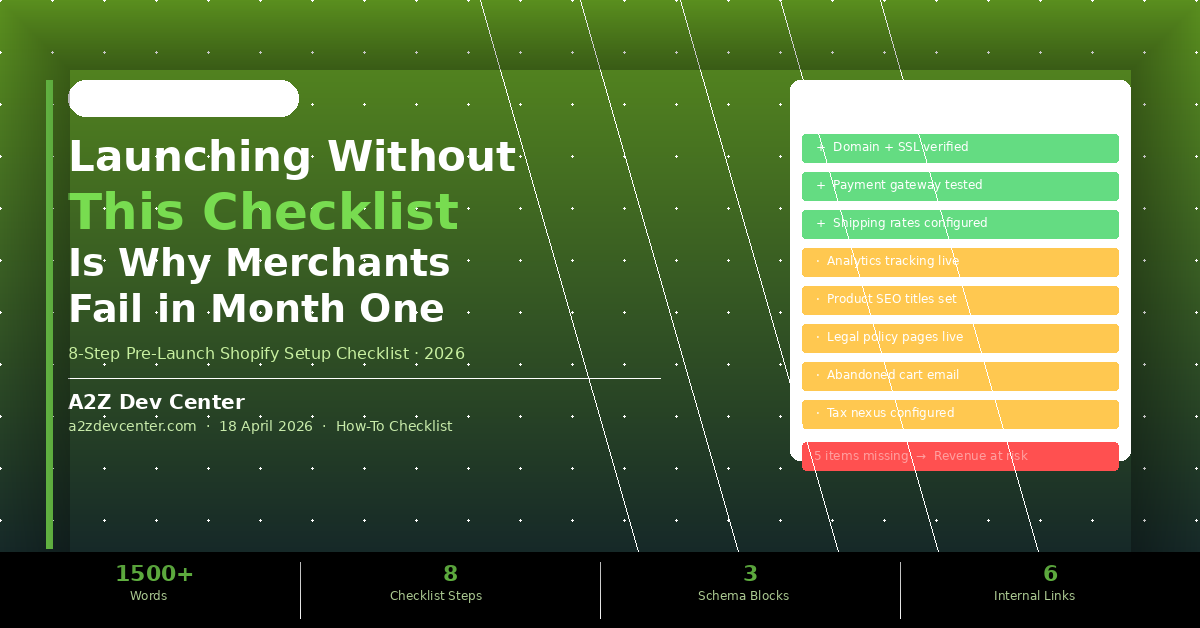
A Shopify store setup checklist is a structured pre-launch verification process covering eight critical configuration categories: domain and SSL setup, payment gateway configuration and testing, shipping rates and carrier setup, tax settings by jurisdiction, legal policy pages, analytics and conversion tracking, product SEO configuration, and abandoned cart recovery setup. Completing all eight before launch prevents the configuration gaps responsible for most new Shopify merchant failures in the first thirty days of operation.
Your Shopify store went live last Tuesday. You’ve told your email list, posted on social, and driven some paid traffic. Twenty-three people made it to the checkout in the first four days. Two completed a purchase. You do not know why twenty-one did not, because you have no analytics tracking and no abandoned cart emails configured. Every one of those incomplete checkouts is revenue you cannot recover. This is not a traffic problem. It is a launch checklist problem.
This guide covers the complete shopify store setup checklist that prevents month-one failures. Each of the eight items represents a real revenue risk if it is missing at launch, not a nice-to-have optimisation for later.
Why So Many Shopify Stores Fail in the First 30 Days
New Shopify merchants fail in month one because they follow Shopify’s basic onboarding flow, which gets a store technically live but does not configure the systems that determine whether the store generates and retains revenue.
A home goods merchant launched their Shopify store after two months of product development and photography. The store looked excellent. On launch day, fourteen orders were placed. Three were immediately cancelled because the shipping rates were incorrect, charging $4.99 for items that cost $18 to ship. Two more orders never completed because the payment gateway was in test mode. Four abandoned carts received no follow-up email because the automated recovery flow was never configured. That merchant retained seven of fourteen launch-day orders and never recovered the intent of the other seven customers.
According to Baymard Institute’s checkout research, the average documented cart abandonment rate exceeds 70 percent. For a new Shopify store with configuration problems, this rate is typically higher because technical failures and trust gaps compound the natural abandonment that occurs even on optimised stores. The issues are almost always fixable in a few hours if caught before launch. They are significantly more damaging to recover from after launch when customers have already experienced them.
The Complete Shopify Store Setup Checklist (8 Steps)
Complete every step in this checklist before driving any paid or owned traffic to your Shopify store. Steps 1 through 4 are revenue-critical. Steps 5 through 8 are conversion-critical.
STEP 1
Verify Domain Connection and SSL Certificate
Your custom domain must be connected and propagated before launch, and the SSL padlock must be showing in the browser on every page. Shopify provides SSL automatically through Let’s Encrypt for all stores on paid plans, but domain propagation takes 24 to 48 hours after connection. Launching before propagation is complete means some customers will reach the store on the wrong domain or see a security warning. Test domain connection from an incognito browser on a separate device before announcing the launch to confirm what a new visitor actually sees.
STEP 2
Test the Payment Gateway End-to-End in Shopify’s Test Mode
Every new Shopify store must be tested through a complete purchase cycle using Shopify’s built-in Bogus Gateway test mode before live payment processing is enabled. Use the test card number 1 to simulate a successful payment and the test card number 2 to simulate a payment failure. Verify that the successful order triggers the order confirmation email, the customer receives the correct order summary, and the order appears correctly in the Shopify admin. Then disable test mode and verify the live gateway is active. A store that launches with the gateway still in test mode processes zero real transactions regardless of how many customers attempt to purchase. Our Shopify development service includes payment gateway configuration and end-to-end testing as a required pre-launch deliverable on every engagement.
STEP 3
Configure Shipping Rates Accurately by Product Weight and Zone
Incorrect shipping configuration is the most common cause of post-launch order cancellations and customer complaints on new Shopify stores. Configure shipping rates based on actual carrier rate tables for your typical product weights, not estimates. Set up shipping zones for domestic and international delivery with the correct carrier services for each zone. Test shipping rate calculation by adding representative products to the cart and proceeding through checkout to verify the rate displayed matches your intended pricing. A product that shows free shipping but costs $18 to fulfil creates an immediate margin problem on every order. Configure Shopify Shipping or third-party carrier rates through the Shopify settings shipping section before any traffic reaches the store.
STEP 4
Set Tax Collection Rules for Your Selling Jurisdictions
US-based Shopify merchants must configure tax collection for every state where they have nexus, which typically includes at minimum the state where the business is registered. Following the 2018 South Dakota v. Wayfair Supreme Court decision, economic nexus laws require sales tax collection in states where you exceed specific revenue or transaction thresholds even without a physical presence. Shopify’s automatic tax calculation covers US state rates when properly configured, but the nexus states must be enabled in the tax settings. Selling without proper tax collection creates liability that accumulates with every order. A qualified eCommerce development service review includes tax nexus configuration as a compliance requirement, not an optional setup step.
STEP 5
Publish All Required Legal Policy Pages
A Shopify store without a published return policy, privacy policy, terms of service, and shipping policy loses a measurable percentage of customers who look for these pages before completing a purchase. Shopify generates template versions of all four policy pages through the Legal section of the Settings menu. These templates must be customized with your specific business details, return window, and shipping timeframes before publishing. They are not optional: a return policy is legally required for eCommerce merchants in most US states, and a privacy policy is required under GDPR and CCPA for any store serving customers in California or the EU. According to BrightLocal’s consumer trust research, trust signals including transparent policies and return guarantees are among the top factors consumers evaluate before making a first purchase from an unfamiliar brand online.
STEP 6
Install Google Analytics 4 and Shopify’s Meta Pixel Before Launch
Analytics and conversion tracking must be configured before any traffic reaches the store, because data collected after launch cannot be retroactively applied to pre-configuration visits. Connect Google Analytics 4 through the Shopify Online Store settings, verify the GA4 purchase event is firing correctly on the order confirmation page, and install the Meta Pixel through Shopify’s Facebook and Instagram sales channel for retargeting capability. Without this configuration, you cannot identify which traffic sources produce purchases, which products are viewed without adding to cart, or which checkout steps cause the most abandonment. The UI/UX design decisions that improve conversion rates are only identifiable through analytics data collected from the moment of launch. Our broader guide on why most Shopify stores fail to scale covers what happens when analytics gaps compound over months into undiagnosable conversion problems — and why the same UX principles covered in our guide on UX as a revenue killer apply to eCommerce stores from day one.
STEP 7
Configure Product Page SEO Titles and Meta Descriptions
Every product page on your Shopify store defaults to the product title as the SEO title and the product description as the meta description, which is rarely optimal for search visibility or click-through rate from search results. Review every product page’s SEO section in the Shopify editor and write specific meta titles that include the primary search term customers use to find that product plus the brand name, and meta descriptions of 140 to 155 characters that include a clear value proposition and call to action. This takes fifteen to thirty minutes per product page and produces measurably better organic search performance from the first week of operation compared to stores that leave default settings in place. The structured URL handle should also be reviewed to ensure it is readable and keyword-relevant rather than Shopify’s auto-generated version.
STEP 8
Set Up Abandoned Cart Recovery and Post-Purchase Email Flows
Shopify includes a native abandoned cart recovery email that should be enabled and customized before launch, because every customer who abandons a cart without receiving a recovery email represents permanently lost revenue that a simple automated email could have recovered. Configure the recovery email timing to send one hour after abandonment for the first email and 24 hours after for the second. Customize both to include the specific products left in the cart and a clear link back to the checkout. Add a post-purchase email sequence that delivers the order confirmation, shipping notification, and a follow-up requesting a review or repeat purchase. These automations are built into Shopify Email and require approximately two hours to configure correctly. Every day they are absent after launch represents a full day of abandoned carts with no recovery attempt.
Pre-Launch Risk Summary: A store missing Steps 1-4 cannot process revenue reliably. A store missing Steps 5-8 processes revenue but loses a measurable percentage of potential customers and cannot diagnose or improve its conversion rate from the data. Completing all eight before launch takes four to six hours and prevents both categories of loss simultaneously.
Shopify Launch Mistakes That Cause the Biggest Month-One Losses
Mistake 1: Launching to Paid Traffic Before Testing the Checkout End-to-End
Running paid ads to a Shopify store that has not been tested through a complete purchase cycle is the fastest way to spend an ad budget on traffic that the store cannot convert. Test the checkout from product page to order confirmation on mobile and desktop using multiple payment methods before spending a single dollar on paid traffic. Any friction point that blocks a purchase on your test devices will block purchases from real customers.
Mistake 2: Using Shopify’s Default Theme Without Customising Navigation
Shopify’s default themes come with navigation structures designed to accommodate any store type, which typically means they are not optimised for your specific product catalog depth, your most important product categories, or the customer journey that produces the highest conversion rate for your specific product type. At minimum, configure the main navigation to lead customers directly to your highest-conversion product category within two clicks, and add a search bar prominently visible without scrolling on mobile.
Mistake 3: Setting Up a Single Product Image Per Product
Shopify allows up to 250 images per product and most new merchants upload one. Products with three to eight images including multiple angles, lifestyle context shots, and scale reference images consistently produce higher conversion rates than single-image product pages because customers need to feel confident about what they are purchasing without being able to touch or inspect the product physically. Priorities multi-image setup for your top ten selling products before launch and expand from there.
Frequently Asked Questions
About to Launch Your Shopify Store? Let’s Check the Checklist First.
If you are within two weeks of launching your Shopify store and you have not worked through all eight items on this checklist, you are taking on avoidable revenue risk. The configuration gaps that cause month-one failures are not complicated to fix. They are just easy to miss when you are focused on product photography, copy, and marketing instead of payment gateway test modes and tax nexus settings.
A2Z Dev Center provides Shopify store setup and pre-launch review services for merchants across the US and Michigan market. We start with a free strategy call where we review your current Shopify configuration against the eight-item checklist, identify any gaps that represent live revenue risk, and tell you exactly what closing each gap requires before your launch date. Launch ready, not launch and hope.
Book Your Free Pre-Launch Shopify Checklist Review →
Schedule a call
Talk to a subject-matter expert
Web development, SEO, or digital marketing — tell us about your project and we'll get back within one business day. No obligation.
- Free scope & strategy session
- A senior specialist, not a sales rep
- Your details stay confidential